|
Open CASCADE Technology 7.9.0
|

|
|
Open CASCADE Technology 7.9.0
|
|
On Windows, the easiest way to install third-party libraries is to download archive with pre-built binaries from https://dev.opencascade.org/resources/download/3rd-party-components. On Linux and macOS, it is recommended to use the version installed in the system natively.
This section presents guidelines for building third-party products used by Open CASCADE Technology (OCCT) and samples on Windows platform. It is assumed that you are already familiar with MS Visual Studio / Visual C++.
You need to use the same version of MS Visual Studio for building all third-party products and OCCT itself, in order to receive a consistent set of runtime binaries.
It is recommended to create a separate new folder on your workstation, where you will unpack the downloaded archives of the third-party products, and where you will build these products (for example, c:/occ3rdparty). Further in this document, this folder is referred to as 3rdparty.
Tcl/Tk is required for DRAW test harness.
Installation from sources: Tcl
Download the necessary archive from https://www.tcl.tk/software/tcltk/download.html and unpack it.
In the win sub-directory, edit file buildall.vc.bat:
Edit the line "call ... vcvars32.bat" to have correct path to the version of Visual Studio to be used for building, for instance:
call "%VS80COMNTOOLS%\vsvars32.bat"
If you are building 64-bit version, set environment accordingly, e.g.:
call "%VS80COMNTOOLS%\..\..\VC\vcvarsall.bat" amd64
INSTALLDIR pointing to directory where Tcl/Tk will be installed, e.g.: set INSTALLDIR=D:\OCCT\3rdparty\tcltk-86-32
install to the first command line calling nmake: nmake -nologo -f makefile.vc release htmlhelp install %1
nmake (building statically linked executable)Edit file rules.vc replacing line
SUFX = tsgx
by
SUFX = sgx
This is to avoid extra prefix 't' in the library name, which is not recognized by default by OCCT build tools.
makefile.vc replacing strings "crt = -MD" by "crt = -MT"tclMain.c (located in folder generic) commenting out forward declaration of function isatty().buildall.vc.battclsh executable installed; check subfolder bin of specified installation path to verify this.tclsh executable created in subfolder bin of INSTALLDIR and named with Tcl version number suffix, as tclsh.exe (with no suffix) > cd D:\OCCT\3rdparty\tcltk-86-32\bin > cp tclsh86.exe tclsh.exe
Installation from sources: Tk
Download the necessary archive from https://www.tcl.tk/software/tcltk/download.html and unpack it. Apply the same steps as described for building Tcl above, with the same INSTALLDIR. Note that Tk produces its own executable, called wish.
You might need to edit default value of TCLDIR variable defined in buildall.vc.bat (should be not necessary if you unpack both Tcl and Tk sources in the same folder).
FreeType is required for text display in a 3D viewer. You can download its sources from https://freetype.org/
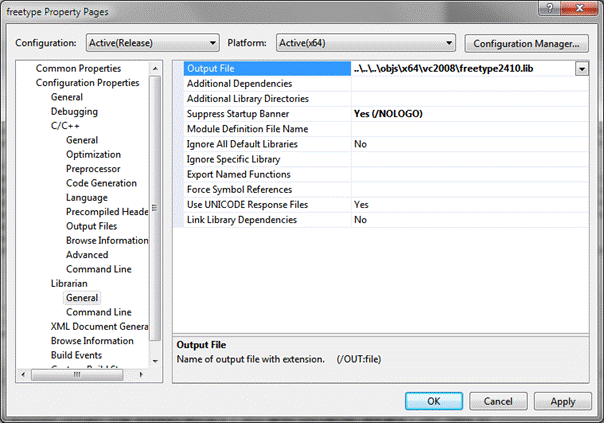
3rdparty folder. As a result, you will get a folder named, for example, 3rdparty/freetype-2.4.10. Further in this document, this folder is referred to as freetype.freetype/builds/win32/vc20xx/freetype.sln in Visual Studio. Here vc20xx stands for your version of Visual Studio.Debug or Release.freetype project.freetype import library (.lib) in the freetype/obj/win32/vc20xx folder.Build - Configuration Manager and add x64 platform to the solution configuration by copying the settings from Win32 platform:
Update the value of the Output File for x64 configuration:
Build the freetype project.
As a result, you will obtain a 64 bit import library (.lib) file in the freetype/x64/vc20xx folder. To build FreeType as a dynamic library (.dll) follow steps 6, 7 and 8 of this procedure.
Configuration Type to Dynamic Library (.dll).freetype/include/freetype/config/ftoption.h:FT_EXPORT and change it as follows: #define FT_EXPORT(x) __declspec(dllexport) x
Build the freetype project.
As a result, you will obtain the files of the import library (.lib) and the dynamic library (.dll) in folders freetype/objs/release or freetype/objs/debug. If you build for a 64 bit platform, follow step 5 of the procedure.
To facilitate the use of FreeType libraries in OCCT with minimal adjustment of build procedures, it is recommended to copy the include files and libraries of FreeType into a separate folder, named according to the pattern freetype-compiler-bitness-building mode, where:
compiler is vc8 or vc9 or vc10 or vc11;bitness is 32 or 64;building mode is opt (for Release) or deb (for Debug).The include subfolder should be copied as is, while libraries should be renamed to freetype.lib and freetype.dll (suffixes removed) and placed to subdirectories lib and bin, respectively. If the Debug configuration is built, the Debug libraries should be put into subdirectories libd and bind.
This third-party product is installed with binaries from the archive that can be downloaded from https://github.com/oneapi-src/oneTBB/releases/tag/v2021.5.0. Go to the Download page, find the release version you need (e.g. oneTBB 2021.5.0) and pick the archive for Windows platform. To install, unpack the downloaded archive of TBB product (oneapi-tbb-2021.5.0-win.zip)
Unpack the downloaded archive of TBB product into the 3rdparty folder.
Further in this document, this folder is referred to as tbb.
This third-party product should be built as a dynamically loadable library (.dll file). You can download its sources from https://sourceforge.net/projects/freeimage/files/Source%20Distribution/
Unpack the downloaded archive of FreeImage product into 3rdparty folder.
As a result, you should have a folder named 3rdparty/FreeImage. Rename it according to the rule: freeimage-platform-compiler-building mode, where
platform is win32 or win64;compiler is vc8 or vc9 or vc10 or vc11;building mode is opt (for release) or deb (for debug)Further in this document, this folder is referred to as freeimage.
freeimage/FreeImage.*.sln in your Visual Studio.Select a configuration to build.
Release if you are building Release binaries.Debug if you are building Debug binaries.Note:
If you want to build a debug version of FreeImage binaries then you need to rename the following files in FreeImage projects:
Project -> Properties -> Configuration Properties -> Linker -> General -> Output File
FreeImage*d*.dll to FreeImage.dll
Project -> Properties -> Configuration Properties -> Linker -> Debugging-> Generate Program Database File
FreeImage*d*.pdb to FreeImage.pdb
Project -> Properties -> Configuration Properties -> Linker -> Advanced-Import Library
FreeImage*d*.lib to FreeImage.lib
Project -> Properties -> Configuration Properties -> Build Events -> Post -> Build Event -> Command Line
FreeImage*d*.dll     to FreeImage.dll
FreeImage*d*.lib     to FreeImage.lib
Additionally, rename in project FreeImagePlus
Project -> Properties -> Configuration Properties -> Linker -> Input -> Additional Dependencies
from FreeImage*d*.lib to FreeImage.lib
Win32 if you are building for a 32 bit platform.x64 if you are building for a 64 bit platform.freeimage/Dist folder (FreeImage.dll and FreeImage.lib).VTK Integration Services component provides adaptation functionality for visualization of OCCT topological shapes by means of VTK library.
3rdparty folder.3rdparty/VTK-6.1.0. Further in this document, this folder is referred to as VTK.VTK folder as source path, and the folder of your choice for VS project and intermediate build data.VTK.sln will be generated in the build folder.This section presents additional guidelines for building third-party products used by Open CASCADE Technology and samples on Linux platform.
Debian-based distributives
All 3rd-party products required for building of OCCT could be installed from official repositories. You may install them from console using apt-get utility:
sudo apt-get install tcllib tklib tcl-dev tk-dev libfreetype-dev libx11-dev libgl1-mesa-dev libfreeimage-dev
sudo apt-get install rapidjson-dev libdraco-dev
Building is possible with C++ compliant compiler:
sudo apt-get install g++
Tcl/Tk is required for DRAW test harness.
Installation from sources: Tcl
Download the necessary archive from https://www.tcl.tk/software/tcltk/download.html and unpack it.
unix sub-directory of the directory where the Tcl source files are located (TCL_SRC_DIR). cd TCL_SRC_DIR/unix
Run the configure command:
configure --enable-gcc --enable-shared --enable-threads --prefix=TCL_INSTALL_DIR
For a 64 bit platform also add --enable-64bit option to the command line.
make
TCL_INSTALL_DIR make install
Installation from sources: Tk
Download the necessary archive from https://www.tcl.tk/software/tcltk/download.html and unpack it.
unix sub-directory of the directory where the Tk source files are located (TK_SRC_DIR) cd TK_SRC_DIR/unix
Run the configure command, where TCL_LIB_DIR is TCL_INSTALL_DIR/lib.
configure --enable-gcc --enable-shared --enable-threads --with-tcl=TCL_LIB_DIR --prefix=TK_INSTALL_DIR
For a 64 bit platform also add --enable-64bit option to the command line.
make
TK_INSTALL_DIR (usually it is TCL_INSTALL_DIR) make install
FreeType is required for text display in the 3D viewer. Download the necessary archive from https://freetype.org/ and unpack it.
FREETYPE_SRC_DIR). cd FREETYPE_SRC_DIR
Run the configure command:
configure --prefix=FREETYPE_INSTALL_DIR
For a 64 bit platform also add ‘CFLAGS=’-m64 -fPIC' CPPFLAGS='-m64 -fPIC'` option to the command line.
configure command has finished successfully, start the building process: make
FREETYPE_INSTALL_DIR make install
This third-party product is installed with binaries from the archive that can be downloaded from https://github.com/oneapi-src/oneTBB/releases/tag/v2021.5.0. Go to the Download page, find the release version you need (e.g. oneTBB 2021.5.0) and pick the archive for Linux platform. To install, unpack the downloaded archive of TBB product (oneapi-tbb-2021.5.0-lin.tgz).
Download the necessary archive from https://sourceforge.net/projects/freeimage/files/Source%20Distribution/ and unpack it. The directory with unpacked sources is further referred to as FREEIMAGE_SRC_DIR.
FREEIMAGE_SRC_DIR/Source/OpenEXR/Imath/ImathMatrix.h:#include string.h
FREEIMAGE_SRC_DIR). cd FREEIMAGE_SRC_DIR
make
Run the installation process
a. If you have the permission to write into directories /usr/include and /usr/lib, run the following command:
make install
b. If you do not have this permission, you need to modify file FREEIMAGE_SRC_DIR/Makefile.gnu:
Change lines 7-9 from:
DESTDIR ?= /
INCDIR  ?= $(DESTDIR)/usr/include
INSTALLDIR  ?= $(DESTDIR)/usr/lib
to:
DESTDIR  ?= $(DESTDIR)
INCDIR  ?= $(DESTDIR)/include
INSTALLDIR  ?= $(DESTDIR)/lib
Change lines 65-67 from:
install  -m 644 -o root -g root $(HEADER) $(INCDIR)
install  -m 644 -o root -g root $(STATICLIB) $(INSTALLDIR)
install  -m 755 -o root -g root $(SHAREDLIB) $(INSTALLDIR)
to:
install  -m 755 $(HEADER) $(INCDIR)
install  -m 755 $(STATICLIB) $(INSTALLDIR)
install  -m 755 $(SHAREDLIB) $(INSTALLDIR)
Change line 70 from:
ldconfig
to:
\#ldconfig
Then run the installation process by the following command:
make DESTDIR=FREEIMAGE_INSTALL_DIR install
make clean
Download the necessary archive from https://www.vtk.org/VTK/resources/software.html and unpack it.
cmake product from the source file.Start cmake in GUI mode with the directory where the source files of VTK are located:
ccmake VTK_SRC_DIR
[c] to make the initial configurationVTK_INSTALL_PREFIX[c] to make the final configuration[g] to generate Makefile and exitmake
VTK_INSTALL_PREFIX option. make install
This section presents additional guidelines for building third-party products used by Open CASCADE Technology and samples on Mac OS X platform (10.6.4 and later).
Tcl/Tk is required for DRAW test harness.
Installation from sources: Tcl
Download the necessary archive from https://www.tcl.tk/software/tcltk/download.html and unpack it.
macosx sub-directory of the directory where the Tcl source files are located (TCL_SRC_DIR). cd TCL_SRC_DIR/macosx
Run the configure command
configure --enable-gcc --enable-shared --enable-threads --prefix=TCL_INSTALL_DIR
For a 64 bit platform also add --enable-64bit option to the command line.
configure command has finished successfully, start the building process make
TCL_INSTALL_DIR. make install
Installation from sources: Tk
Download the necessary archive from https://www.tcl.tk/software/tcltk/download.html and unpack it.
macosx sub-directory of the directory where the source files of Tk are located (TK_SRC_DIR). cd TK_SRC_DIR/macosx
Run the configure command, where TCL_LIB_DIR is TCL_INSTALL_DIR/lib
configure --enable-gcc --enable-shared --enable-threads --with-tcl=TCL_LIB_DIR --prefix=TK_INSTALL_DIR
For a 64 bit platform also add --enable-64bit option to the command line.
configure command has finished successfully, start the building process: make
TK_INSTALL_DIR (usually it is TCL_INSTALL_DIR). make install
FreeType is required for text display in the 3D viewer. Download the necessary archive from https://freetype.org/ and unpack it.
FREETYPE_SRC_DIR). cd FREETYPE_SRC_DIR
Run the configure command
configure --prefix=FREETYPE_INSTALL_DIR
For a 64 bit platform also add ‘CFLAGS=’-m64 -fPIC' CPPFLAGS='-m64 -fPIC'` option to the command line.
configure command has finished successfully, start the building process make
FREETYPE_INSTALL_DIR. make install
This third-party product is installed with binaries from the archive that can be downloaded from https://github.com/oneapi-src/oneTBB/releases/tag/v2021.5.0. Go to the Download page, find the release version you need (e.g. oneTBB 2021.5.0) and pick the archive for Mac OS X platform. To install, unpack the downloaded archive of TBB product (oneapi-tbb-2021.5.0-mac.tgz).
Download the necessary archive from https://sourceforge.net/projects/freeimage/files/Source%20Distribution/ and unpack it. The directory with unpacked sources is further referred to as FREEIMAGE_SRC_DIR.
Note that for building FreeImage on Mac OS X 10.7 you should replace Makefile.osx in FREEIMAGE_SRC_DIR by the corrected file, which you can find in attachment to issue #22811 in OCCT Mantis bug tracker.
If you build FreeImage 3.15.x you can skip this step.
Modify FREEIMAGE_SRC_DIR/Source/OpenEXR/Imath/ImathMatrix.h:
In line 60 insert the following:
#include string.h
Modify FREEIMAGE_SRC_DIR/Source/FreeImage/PluginTARGA.cpp:
In line 320 replace:
SwapShort(value);
with:
SwapShort(&value);
FREEIMAGE_SRC_DIR). cd FREEIMAGE_SRC_DIR
make
Run the installation process
/usr/local/include and /usr/local/lib directories, run the following command: make install
If you do not have this permission, you need to modify file FREEIMAGE_SRC_DIR/Makefile.osx:
Change line 49 from:
PREFIX ?= /usr/local
to:
PREFIX ?= $(PREFIX)
Change lines 65-69 from:
install -d -m 755 -o  root -g wheel $(INCDIR) $(INSTALLDIR)
install  -m 644 -o root -g wheel $(HEADER) $(INCDIR)
install  -m 644 -o root -g wheel $(SHAREDLIB) $(STATICLIB) $(INSTALLDIR)
ranlib  -sf $(INSTALLDIR)/$(STATICLIB)
ln  -sf $(SHAREDLIB) $(INSTALLDIR)/$(LIBNAME)
to:
install  -d $(INCDIR) $(INSTALLDIR)
install  -m 755 $(HEADER) $(INCDIR)
install  -m 755 $(STATICLIB) $(INSTALLDIR)
install  -m 755 $(SHAREDLIB) $(INSTALLDIR)
ln  -sf $(SHAREDLIB) $(INSTALLDIR)/$(VERLIBNAME)
ln  -sf $(VERLIBNAME) $(INSTALLDIR)/$(LIBNAME)
Then run the installation process by the following command:
make PREFIX=FREEIMAGE_INSTALL_DIR install
make clean