|
Open CASCADE Technology
7.5.0
|
|
Open CASCADE Technology
7.5.0
|
This article describes the CMake-based build process, which is now suggested as a standard way to produce the binaries of Open CASCADE Technology from sources. OCCT requires CMake version 2.8.12 or later.
Here we describe the build procedure on the example of Windows platform with Visual Studio 2010. However, CMake is cross-platform and can be used to build OCCT on Linux and OS X in essentially the same way.
CMake is a tool that generates the actual project files for the selected target build system (e.g. Unix makefiles) or IDE (e.g. Visual Studio 2010).
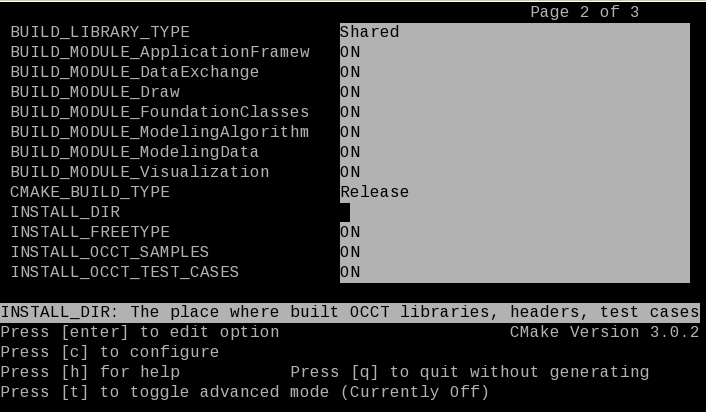
For unexperienced users we recommend to start with cmake-gui – a cross-platform GUI tool provided by CMake on Windows, Mac and Linux. A command-line alternative, ccmake can also be used.
CMake deals with three directories: source, build or binary and installation.
The good practice is not to use the source directory as a build one. Different configurations should be built in different build directories to avoid conflicts. It is however possible to choose one installation directory for several configurations of OCCT (differentiated by platform, bitness, compiler and build type), for example:
d:/occt/                   -- the source directory
d:/tmp/occt-build-vc10-x64 -- the build directory with the generated
                              solution and other intermediate files created during a CMake tool working
d:/occt-install            -- the installation directory that is
                              able to contain several OCCT configurations
If the command-line tool is used, run the tool from the build directory with a single argument indicating the source (relative or absolute path) directory:
cd d:/tmp/occt-build-vc10-x64
ccmake d:/occt
Press c to configure.
All actions required in the configuration process with the GUI tool will be described below.
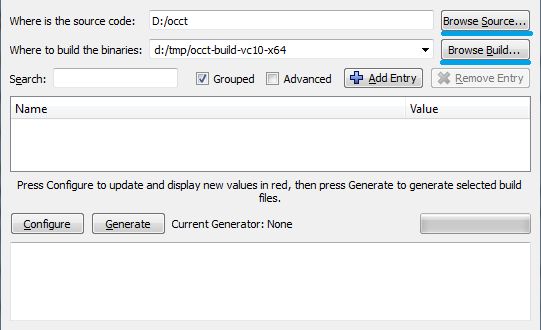
If the GUI tool is used, run this tool without additional arguments and after that specify the source directory by clicking Browse Source and the build (binary) one by clicking Browse Build.
Note: Each configuration of the project should be built in its own directory. When building multiple configurations it is recommended to indicate in the name of build directories the system, bitness and compiler (e.g., d:/occt/build/win32-vc10 ).
Once the source and build directories are selected, "Configure" button should be pressed in order to start manual configuration process. It begins with selection of a target configurator. It is "Visual Studio 10 2010 Win64" in our example.
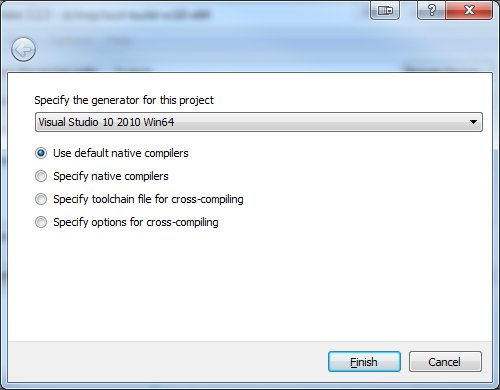
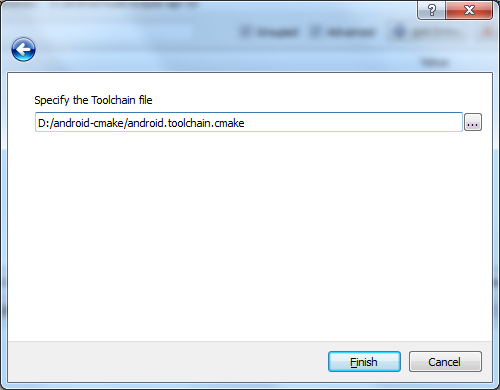
To build OCCT for Universal Windows Platform (UWP) specify the path to toolchain file for cross-compiling d:/occt/adm/templates/uwp.toolchain.config.cmake.
Alternatively, if you are using CMake from the command line add options -DCMAKE_SYSTEM_NAME=WindowsStore -DCMAKE_SYSTEM_VERSION=10.0 .
Note: Universal Windows Platform (UWP) is supported only on "Visual Studio 14 2015". File d:/occt/samples/xaml/ReadMe.md describes the building procedure of XAML (UWP) sample.
Once "Finish" button is pressed, the first pass of the configuration process is executed. At the end of the process, CMake outputs the list of environment variables, which have to be properly specified for successful configuration.
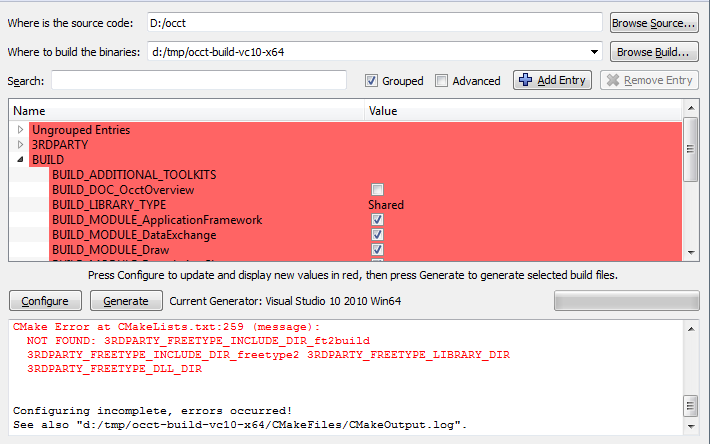
The error message provides some information about these variables. This message will appear after each pass of the process until all required variables are specified correctly.
The change of the state of some variables can lead to the appearance of new variables. The new variables appeared after the pass of the configuration process are highlighted with red color by CMake GUI tool.
Note: There is "grouped" option, which groups variables with a common prefix.
The following table gives the full list of environment variables used at the configuration stage:
| Variable | Type | Purpose |
|---|---|---|
| CMAKE_BUILD_TYPE | String | Specifies the build type on single-configuration generators (such as make). Possible values are Debug, Release and RelWithDebInfo |
| USE_FREEIMAGE | Boolean flag | Indicates whether FreeImage product should be used in OCCT visualization module for support of popular graphics image formats (PNG, BMP, etc.) |
| USE_RAPIDJSON | Boolean flag | Indicates whether RapidJSON product should be used in OCCT Data Exchange module for support of glTF mesh file format |
| USE_TBB | Boolean flag | Indicates whether TBB 3rd party is used or not. TBB stands for Threading Building Blocks, the technology of Intel Corp, which comes with different mechanisms and patterns for injecting parallelism into your application. OCCT remains parallel even without TBB product |
| USE_VTK | Boolean flag | Indicates whether VTK 3rd party is used or not. VTK stands for Visualization ToolKit, the technology of Kitware Inc intended for general-purpose scientific visualization. OCCT comes with a bridge between CAD data representation and VTK by means of its dedicated VIS component (VTK Integration Services). You may skip this 3rd party unless you are planning to use VTK visualization for OCCT geometry. See the official documentation VTK Integration Services (VIS) for the details on VIS |
| 3RDPARTY_DIR | Path | Defines the root directory where all required 3rd party products will be searched. Once you define this path it is very convenient to click "Configure" button in order to let CMake automatically detect all necessary products |
| 3RDPARTY_FREETYPE_* | Path | Path to Freetype binaries |
| 3RDPARTY_TCL_* 3RDPARTY_TK_* | Path | Path to Tcl/Tk binaries |
| 3RDPARTY_FREEIMAGE* | Path | Path to Freeimage binaries |
| 3RDPARTY_TBB* | Path | Path to TBB binaries |
| 3RDPARTY_VTK_* | Path | Path to VTK binaries |
| BUILD_MODULE_<MODULE> | Boolean flag | Indicates whether the corresponding OCCT module should be built or not. It should be noted that some toolkits of a module can be built even if this module is not checked (this happens if some other modules depend on these toolkits). The main modules and their descriptions can be found in User Guides |
| BUILD_LIBRARY_TYPE | String | Specifies the type of library to be created. "Shared" libraries are linked dynamically and loaded at runtime. "Static" libraries are archives of object files used when linking other targets. Note that Draw Harness plugin system is incompatible with "Static" builds, and therefore it is disabled for these builds. |
| BUILD_ADDITIONAL_TOOLKITS | String | Semicolon-separated individual toolkits to include into build process. If you want to build some particular libraries (toolkits) only, then you may uncheck all modules in the corresponding BUILD_MODUE_<MODULE> options and provide the list of necessary libraries here. Of course, all dependencies will be resolved automatically |
| BUILD_YACCLEX | Boolean flag | Enables Flex/Bison lexical analyzers. OCCT source files relating to STEP reader and ExprIntrp functionality are generated automatically with Flex/Bison. Checking this option leads to automatic search of Flex/Bison binaries and regeneration of the mentioned files |
| BUILD_SAMPLES_MFC | Boolean flag | Indicates whether MFC samples should be built together with OCCT. This option is only relevant to Windows platforms |
| BUILD_SAMPLES_QT | Boolean flag | Indicates whether QT samples should be built together with OCCT. |
| BUILD_Inspector | Boolean flag | Indicates whether Inspector should be built together with OCCT. |
| BUILD_DOC_Overview | Boolean flag | Indicates whether OCCT overview documentation project should be created together with OCCT. It is not built together with OCCT. Checking this option leads to automatic search of Doxygen binaries. Its building calls Doxygen command to generate the documentation in HTML format |
| BUILD_PATCH | Path | Points to the directory recognized as a "patch" for OCCT. If specified, the files from this directory take precedence over the corresponding native OCCT sources. This way you are able to introduce patches to Open CASCADE Technology not affecting the original source distribution |
| BUILD_WITH_DEBUG | Boolean flag | Enables extended messages of many OCCT algorithms, usually printed to cout. These include messages on internal errors and special cases encountered, timing, etc. |
| BUILD_ENABLE_FPE_SIGNAL_HANDLER | Boolean flag | Enable/Disable the floating point exceptions (FPE) during DRAW execution only. Corresponding environment variable (CSF_FPE) can be changed manually in custom.bat/sh scripts without regeneration by CMake. |
| CMAKE_CONFIGURATION_TYPES | String | Semicolon-separated CMake configurations |
| INSTALL_DIR | Path | Points to the installation directory. INSTALL_DIR is a synonym of CMAKE_INSTALL_PREFIX. The user can specify both INSTALL_DIR or CMAKE_INSTALL_PREFIX |
| INSTALL_DIR_BIN | Path | Relative path to the binaries installation directory (absolute path is ${INSTALL_DIR}/${INSTALL_DIR_BIN}) |
| INSTALL_DIR_SCRIPT | Path | Relative path to the scripts installation directory (absolute path is ${INSTALL_DIR}/${INSTALL_DIR_SCRIPT}) |
| INSTALL_DIR_LIB | Path | Relative path to the libraries installation directory (absolute path is ${INSTALL_DIR}/${INSTALL_DIR_LIB}) |
| INSTALL_DIR_INCLUDE | Path | Relative path to the includes installation directory (absolute path is ${INSTALL_DIR}/${INSTALL_DIR_INCLUDE}) |
| INSTALL_DIR_RESOURCE | Path | Relative path to the resources installation directory (absolute path is ${INSTALL_DIR}/${INSTALL_DIR_RESOURCE}) |
| INSTALL_DIR_LAYOUT | String | Defines the structure of OCCT files (binaries, resources, headers, etc.) for the install directory. Two variants are predefined: for Windows (standard OCCT layout) and for Unix operating systems (standard Linux layout). If needed, the layout can be customized with INSTALL_DIR_* variables |
| INSTALL_DIR_DATA | Path | Relative path to the data files installation directory (absolute path is ${INSTALL_DIR}/${INSTALL_DIR_DATA}) |
| INSTALL_DIR_SAMPLES | Path | Relative path to the samples installation directory. Note that only "samples/tcl" folder will be installed. (absolute path is ${INSTALL_DIR}/${INSTALL_DIR_SAMPLES}) |
| INSTALL_DIR_TESTS | Path | Relative path to the tests installation directory (absolute path is ${INSTALL_DIR}/${INSTALL_DIR_TESTS}) |
| INSTALL_DIR_DOC | Path | Relative path to the documentation installation directory (absolute path is ${INSTALL_DIR}/${INSTALL_DIR_DOC}) |
| INSTALL_FREETYPE | Boolean flag | Indicates whether Freetype binaries should be installed into the installation directory |
| INSTALL_FREEIMAGE* | Boolean flag | Indicates whether Freeimage binaries should be installed into the installation directory |
| INSTALL_TBB | Boolean flag | Indicates whether TBB binaries should be installed into the installation directory |
| INSTALL_VTK | Boolean flag | Indicates whether VTK binaries should be installed into the installation directory |
| INSTALL_TCL | Boolean flag | Indicates whether TCL binaries should be installed into the installation directory |
| INSTALL_TEST_CASES | Boolean flag | Indicates whether non-regression OCCT test scripts should be installed into the installation directory |
| INSTALL_DOC_Overview | Boolean flag | Indicates whether OCCT overview documentation should be installed into the installation directory |
Note: Only the forward slashes ("/") are acceptable in the CMake options defining paths.
If 3RDPARTY_DIR directory is defined, then required 3rd party binaries are sought in it, and default system folders are ignored.
The procedure expects to find binary and header files of each 3rd party product in its own sub-directory: bin, lib and include.
The results of the search (achieved on the next pass of the configuration process) are recorded in the corresponding variables:
Note: each library and include directory should be children of the product directory if the last one is defined.
The search process is as follows:
If a variable of any level is not defined (empty or <variable name>-NOTFOUND ) and the upper level variable is defined, the content of the non-defined variable will be sought at the next configuration step. If the search process at level 3 does not find the required files, it seeks in default places.
If a search result (include path, or library path, or dll path) does not meet your expectations, you can change 3RDPARTY_<PRODUCT>__DIR variable*, clear (if they are not empty) 3RDPARTY_<PRODUCT>_DLL_DIR, 3RDPARTY_<PRODUCT>_INCLUDE_DIR and 3RDPARTY_<PRODUCT>_LIBRARY_DIR variables (or clear one of them) and run the configuration process again.
At this time the search will be performed in the newly identified directory and the result will be recorded to corresponding variables (replace old value if it is necessary).
For example, 3RDPARTY_FREETYPE_DIR variable
d:/3rdparty/freetype-2.4.10
can be changed to
d:/3rdparty/freetype-2.5.3
During the configuration process the related variables (3RDPARTY_FREETYPE_DLL_DIR, 3RDPARTY_FREETYPE_INCLUDE_DIR and 3RDPARTY_FREETYPE_LIBRARY_DIR) will be filled with new found values.
Note: The names of searched libraries and header files are hard-coded. If there is the need to change their names, change appropriate cmake variables (edit CMakeCache.txt file or edit in cmake-gui in advance mode) without reconfiguration: 3RDPARTY_<PRODUCT>_INCLUDE for include, 3RDPARTY_<PRODUCT>_LIB for library and 3RDPARTY_<PRODUCT>_DLL for shared library.
Once the configuration process is done, the "Generate" button is used to prepare project files for the target IDE. In our exercise the Visual Studio solution will be automatically created in the buid directory.
Go to the build folder, start the Visual Studio solution OCCT.sln and build it by clicking Build -> Build Solution.
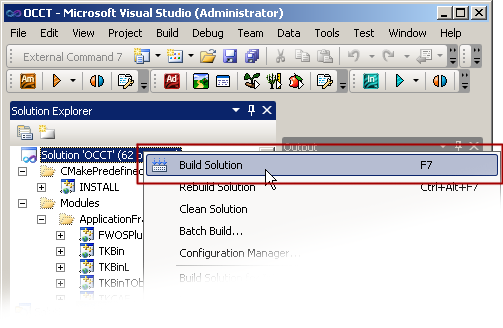
By default the build solution process skips the building of the INSTALL and Overview project.
When the building process is finished build:
For this, right-click on the Overview/INSTALL project and select Project Only -> Build Only -> Overview/INSTALL in the solution explorer.
Installation is a process of extracting redistributable resources (binaries, include files etc) from the build directory into the installation one. The installation directory will be free of project files, intermediate object files and any other information related to the build routines.
Normally you use the installation directory of OCCT to link against your specific application.
The directory structure is as follows:
data            -- data files for OCCT (brep, iges, stp)
doc             -- OCCT overview documentation in HTML format
inc             -- header files
samples         -- samples
src             -- all required source files for OCCT
tests           -- OCCT test suite
win32\vc10\bind -- binary files (installed 3rdparties and occt)
          \libd -- libraries (installed 3rdparties and occt)
Note: The above example is given for debug configuration. However, it is generally safe to use the same installation directory for the release build. In the latter case the contents of install directory will be enriched with subdirectories and files related to the release configuration. In particular, the binaries directory win64 will be expanded as follows:
\win32\vc10\bind
           \libd
           \bin
           \lib
If CMake installation flags are enabled for the 3rd party products (e.g. INSTALL_FREETYPE), then the corresponding binaries will be copied to the same bin(d) and lib(d) directories together with the native binaries of OCCT. Such organization of libraries can be especially helpful if your OCCT-based software does not use itself the 3rd parties of Open CASCADE Technology (thus, there is no sense to pack them into dedicated directories).
The installation folder contains the scripts to run DRAWEXE (draw.bat or draw.sh), samples (if they were installed) and overview.html (short-cut for installed OCCT overview documentation).
This file describes steps to build OCCT libraries from sources using Code::Blocks, a cross-platform IDE, using project files generated by OCCT legacy tool genproj. It can be used as an alternative to CMake build system (see Building with CMake tool) for all supported platforms.
Before building OCCT, make sure to have all the needed third-party libraries installed, see Build, Debug and Upgrade.
Before building it is necessary to set up build environment.
The environment is defined in the file custom.sh (on Linux and OS X) or custom.bat (on Windows) which can be edited directly:
Alternatively, or when custom.sh or custom.bat does not exist, you can launch genconf tool to configure environment interactively:
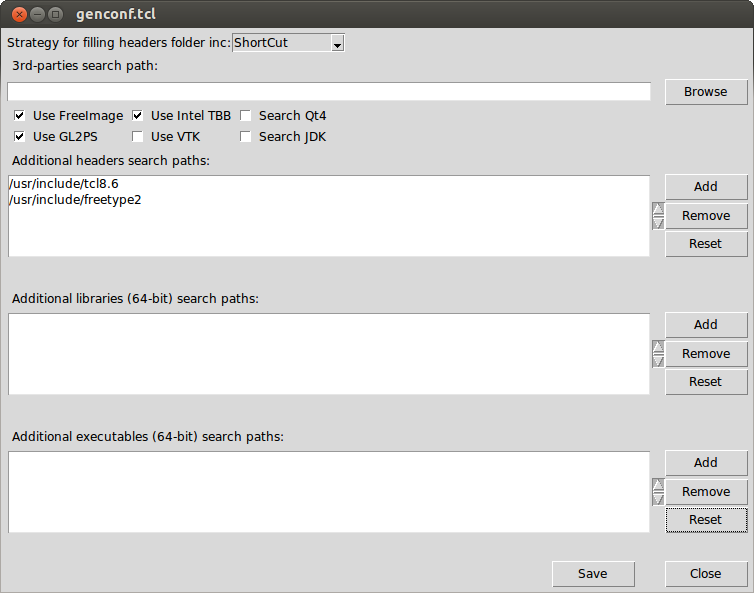
Click "Save" to store the specified configuration in custom.sh or custom.bat file.
Launch genproj tool with option cbp to update content of inc folder and generate project files after changes in OCCT code affecting layout or composition of source files:
The generated Code::Blocks project are placed into subfolder adm/<OS>/cbp.
To start Code::Blocks, launch script codeblocks.sh.
To build all toolkits, click Build->Build workspace in the menu bar.
To start DRAWEXE, which has been built with Code::Blocks on Mac OS X, run the script
Option d is used if OCCT has been built in Debug mode.
This page describes steps to build OCCT libraries from a complete source archive on Windows with MS Visual C++ using projects generated by genproj tool. It is an alternative to use of CMake build system (see Building with CMake tool).
genproj is a legacy tool (originated from command "wgenproj" in WOK) for generation of Visual Studio, Code.Blocks, and XCode project files used for building Open CASCADE Technology. These project files are placed inside OCCT directory (in adm subfolder) and use relative paths, thus can be moved together with sources.
The project files included in official distribution of OCCT are generated by this tool. If you have official distribution with project files included, you can use them directly without a need to call genproj.
Before building OCCT, make sure to have all the required third-party libraries installed.
The easiest way to install third-party libraries is to download archive with pre-built binaries, corresponding to version of Visual Studio you are using, from https://opencascade.com/content/3rd-party-components.
You can also build third-party libraries from their sources, see Build 3rd-parties for instructions.
If you have Visual Studio projects already available (pre-installed or generated), you can edit file custom.bat manually to adjust the environment:
| VCVER | Visual Studio version | Windows Platform | Binaries folder name |
|---|---|---|---|
| vc10 | 2010 (10) | Desktop (Windows API) | vc10 |
| vc11 | 2012 (11) | Desktop (Windows API) | vc11 |
| vc12 | 2013 (12) | Desktop (Windows API) | vc12 |
| vc14 | 2015 (14) | Desktop (Windows API) | vc14 |
| vc14-uwp | 2015 (14) | UWP (Universal Windows Platform) | vc14-uwp |
| vc141 | 2017 (15) | Desktop (Windows API) | vc14 |
| vc141-uwp | 2017 (15) | UWP (Universal Windows Platform) | vc14-uwp |
| vc142 | 2019 (16) | Desktop (Windows API) | vc14 |
| vc142-uwp | 2019 (16) | UWP (Universal Windows Platform) | vc14-uwp |
Alternatively, you can launch genconf, a GUI tool allowing to configure build options interactively. That tool will analyze your environment and propose you to choose available options:
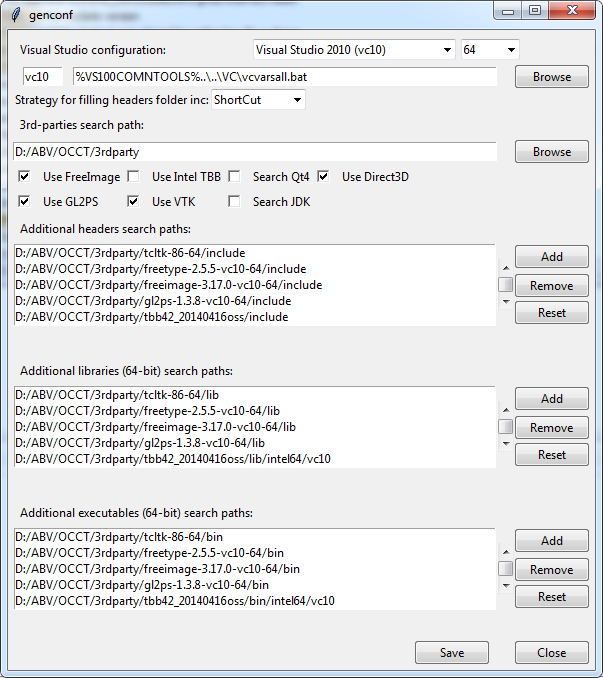
Click "Save" to store the specified configuration in custom.bat file.
Launch genproj to update content of inc folder and generate project files after changes in OCCT code affecting layout or composition of source files.
Note that if custom.bat is not present, genproj will start genconf to configure environment.
Launch msvc.bat to start Visual Studio with all necessary environment variables defined, and build the whole solution or required toolkits.
Note: the MSVC project files are located in folders adm\msvc\vc.... Binaries are produced in win32 or win64 folders.
To start DRAW, launch draw.bat.
You may choose one of the following ways to generate, configure and build OCCT sources on Linux just keeping in mind this platform specific:
This article describes the steps to build OCCT libraries for Android from a complete source package with GNU make (makefiles). The steps on Windows 7 and Ubuntu 15.10 are similar. There is the only one difference: makefiles are built with mingw32-make on Windows and native GNU make on Ubuntu.
Required tools (download and install if it is required):
Run GUI tool provided by CMake.
Configure Tools
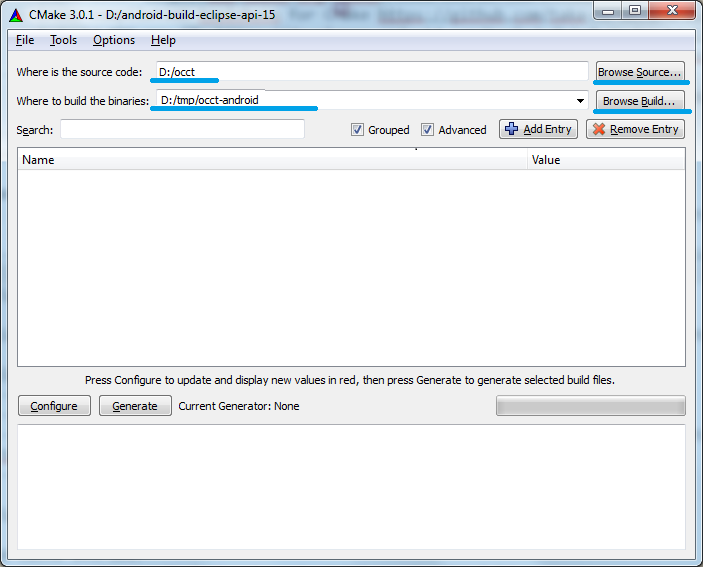
Click Configure button. It opens the window with a drop-down list of generators supported by CMake project.
Select "MinGW MakeFiles" item from the list
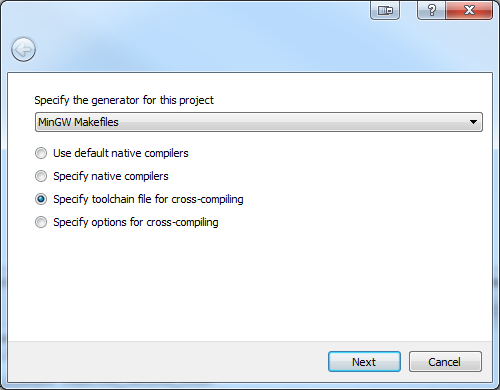
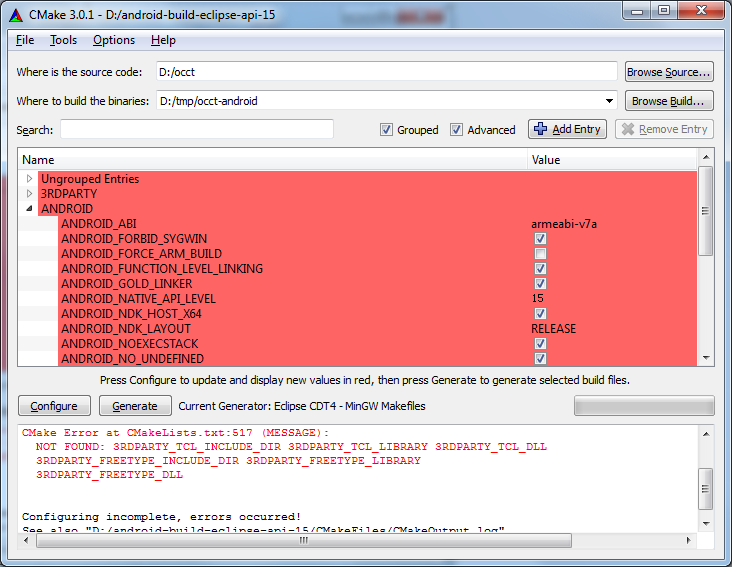
If ANDROID_NDK environment variable is not defined in current OS, add cache entry ANDROID_NDK (entry type is PATH) – path to the NDK folder ("Add Entry" button)

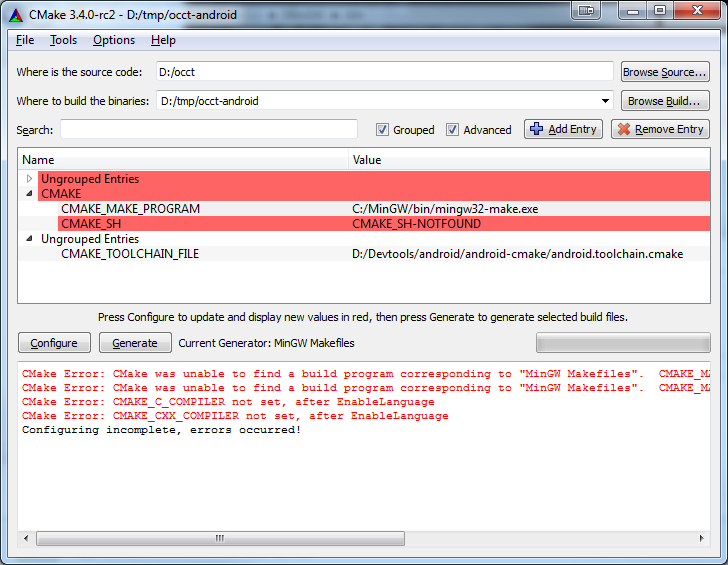
If on Windows the message is appeared: "CMake Error: CMake was unable to find a build program corresponding to "MinGW Makefiles" CMAKE_MAKE_PROGRAM is not set. You probably need to select a different build tool.", specify CMAKE_MAKE_PROGRAM to mingw32-make executable.
Configure OCCT
How to configure OCCT, see "OCCT Configuration" section of Configure, Generate, Build using CMake tool taking into account the specific configuration variables for android:
Click Generate button and wait until the generation process is finished. Then makefiles will appear in the build folder (e.g. D:/tmp/occt-android ).
Open console and go to the build folder. Type "mingw32-make" (Windows) or "make" (Ubuntu) to start build process.
mingw32-make
or
make
Parallel building can be started with using **"-jN"** argument of "mingw32-make/make", where N is the number of building threads.
mingw32-make -j4
or
make -j4
Type "mingw32-make/make" with argument "install" to place the libraries to the install folder
mingw32-make install
or
make install
This file describes steps to build OCCT libraries from sources on Mac OS X with Xcode projects, generated by OCCT legacy tool genproj.
Before building it is necessary to set up build environment.
The environment is defined in the file custom.sh which can be edited directly:
Alternatively, or when custom.sh does not exist, you can launch genconf.sh to configure environment interactively:
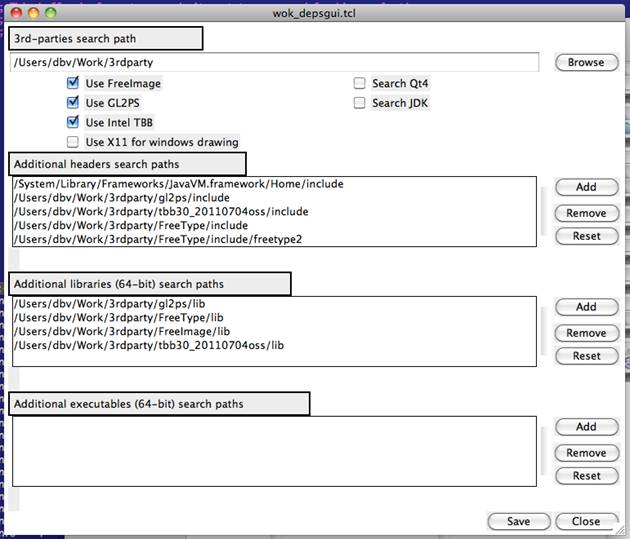
Click "Save" to store the specified configuration in custom.sh file.
Launch genproj tool to update content of inc folder and generate project files after changes in OCCT code affecting layout or composition of source files.
For instance, in Terminal application:
To start Xcode, launch script xcode.sh.
To build a certain toolkit, select it in Scheme drop-down list in Xcode toolbar, press Product in the menu and click Build button.
To build the entire OCCT:
To start DRAWEXE, which has been built with Xcode on Mac OS X, perform the following steps:
1.Open Terminal application
2.Enter <OCCT_ROOT_DIR>:
3.Run the script
Option d is used if OCCT has been built in Debug mode.
This file describes steps to build OCCT libraries from sources using Code::Blocks, a cross-platform IDE, using project files generated by OCCT legacy tool genproj.
Before building it is necessary to set up build environment.
The environment is defined in the file custom.sh (on Linux and OS X) or custom.bat (on Windows) which can be edited directly:
Alternatively, or when custom.sh or custom.bat does not exist, you can launch genconf tool to configure environment interactively:
Click "Save" to store the specified configuration in custom.sh or custom.bat file.
Launch genproj tool with option cbp to update content of inc folder and generate project files after changes in OCCT code affecting layout or composition of source files:
The generated Code::Blocks project are placed into subfolder adm/<OS>/cbp.
To start Code::Blocks, launch script codeblocks.sh.
To build all toolkits, click Build->Build workspace in the menu bar.
To start DRAWEXE, which has been built with Code::Blocks on Mac OS X, run the script
Option d is used if OCCT has been built in Debug mode.
 1.8.13